 前端加油站🧠
Appearance
学习英语,是不是变相的提升自己的编程能力呢?
果然后悔自己当初没有认真学习,再次体会到了不好好学习所带来的痛点。

我的目标就是提升自己的英语阅读能力(先不涉及口语),至少先做到不会被英文文档劝退!
身边有几个有趣的同事
一个大四英语专业的女同事,技术和能力都挺强的(比我大四的时候要强也要厉害,无论的编码能力还是薪资),坐我旁边,发现她经常看英文的文档,虽然这个和技术没有必然的联系,但就这一点已经购全方位吊打我了。
另一个自称没有通过英语四级的同事,印象中也是一个勇于看英文文档的勇者(对我来说是一个勇者,因为我基本看到英语文档就会被劝退),一次偶然机会我和他一起看一篇技术类文章,我不会的地方他都能很好的翻译出来,因为这个也令我对他再次刮目想看!
甚至还有技术很强的同事因为英语不好错过了一些更好的工作机会!
我打算如何学习呢?
诚然,毕业之后的我不知道应该如何学习英语了,背单词?看长难句?好像都不太行。
就完整的看一篇英文文档吧!我选择的是 Vue3 的官网:传送门 ,原因有下:
- Vue3 是新技术,看官网除了学习英文以外,还能学习到一些其作者想表达的一些开发思想
- Vue3 有中文文档,在实在看不下去的时候,难以理解的时候,还有 参考答案
再搭配上翻译插件,目前看来是一个还蛮不错的方式!
阅读记录
[x] 首页
[x] Introduction
介绍了什么是 Vue,其中比较重要的两个核心特性,对渐进式框架、单文件组件、做出解释,同时介绍了两种 API 风格,并做出两种风格的对比以及简单的建议。最后是学习路径的推荐。
[x] Quick Start
快速开始的内容,推荐了 Vite 这个更快更轻的构建工具,使用构建工具构建一个新项目,以及我们可以不使用构建工具的情况下运行 Vue3 的代码,提供了一些代码案例,其中使用到了一些比较新的 API,如
type = importmap,如下:html<script type="importmap"> { "imports": { "vue": "https://unpkg.com/vue@3/dist/vue.esm-browser.js" } } </script> <div id="app">{{ message }}</div> <script type="module"> import { createApp } from 'vue' createApp({ data() { return { message: 'Hello Vue!', } }, }).mount('#app') </script><script type="importmap"> { "imports": { "vue": "https://unpkg.com/vue@3/dist/vue.esm-browser.js" } } </script> <div id="app">{{ message }}</div> <script type="module"> import { createApp } from 'vue' createApp({ data() { return { message: 'Hello Vue!', } }, }).mount('#app') </script>这个对于我来说是个新东西,过去我只知道使用
type = import让浏览器直接使用 ESM 来进行解析一些模块化的语法,现在才知道可以直接这样写,支持模块化的导入一些线上的库,就有点类似于package.json的作用了。只是这个语法和 vue3 一样有兼容性,只有现代的浏览器才能使用。
[x] Creating an Application
可以通过
createApp()方法创建一个应用实例,同时要注意需要有一个根组件,其他的组件都基于这个根组件之上实现,mount()方法挂载之前整个应用实例都不会进行渲染,最后是介绍了一些 APP 的配置项,如注册组件等,其中比较重要的也是之前不太清晰的是,app 实例会暴露一个 config 对象,可以在这个 config 上做一个操作,如:全局的错误处理等等:jsapp.config.errorHandler = err => { /* handle error */ }app.config.errorHandler = err => { /* handle error */ }也可以在一个应用上使用多个实例(如果需要这么做的话)
jsconst app1 = createApp({ /* ... */ }) app1.mount('#container-1') const app2 = createApp({ /* ... */ }) app2.mount('#container-2')const app1 = createApp({ /* ... */ }) app1.mount('#container-1') const app2 = createApp({ /* ... */ }) app2.mount('#container-2')[x] Template 语法
介绍一些 Template 的语法以及 Vue 的一些指令,如:插值表达式、v-html、等等,语法和 vue2 一致,对我来说没有什么比较新奇的东西,就不详细记录了。
[x] Reactivity Fundamentals
响应式系统是通过
Proxy API实现的,和 Vue2 不同的地方在于,一些自定义的值是不会被设为响应式的,确保始终将响应式状态作为 this 的属性访问:jsexport default { data() { return { someObject: {}, } }, mounted() { const newObject = {} this.someObject = newObject console.log(newObject === this.someObject) // false }, } // newObject 并不会成为一个响应式对象export default { data() { return { someObject: {}, } }, mounted() { const newObject = {} this.someObject = newObject console.log(newObject === this.someObject) // false }, } // newObject 并不会成为一个响应式对象DOM 更新的时机实际上并不是同步更新的,而是每次 state 更改都会统一收集一些变化,再在next tick时机进行更新(这么做可能是为了达到性能最优避免太多次的 render 吧,我猜的),next tick我还不是很清晰,之后的内容更新到会详细的记录。
默认响应式系统都是会支持深层次的对象的,为了性能优化我们可以使用
shallowReactive()只给根层次的对象属性绑定上响应式,这个也是一个性能优化的点。最后是如何使用一个安全的自带状态的函数的函数,如:防抖、节流这种函数本身是自带状态的,项目中经常使用
lodash工具库,如果直接使用会触发状态碰撞问题可能达不到效果,这时候可以将函数在实例上绑定一次再使用就不会有问题:js// 可能会有问题, debounce 本身就有状态 import { debounce } from 'lodash-es' export default { methods: { // Debouncing with Lodash click: debounce(function () { // ... respond to click ... }, 500) } } // 解决方法 -- 状态统一 export default { created() { // each instance now has its own copy of debounced handler this.debouncedClick = _.debounce(this.click, 500) }, unmounted() { // also a good idea to cancel the timer // when the component is removed this.debouncedClick.cancel() }, methods: { click() { // ... respond to click ... } } }// 可能会有问题, debounce 本身就有状态 import { debounce } from 'lodash-es' export default { methods: { // Debouncing with Lodash click: debounce(function () { // ... respond to click ... }, 500) } } // 解决方法 -- 状态统一 export default { created() { // each instance now has its own copy of debounced handler this.debouncedClick = _.debounce(this.click, 500) }, unmounted() { // also a good idea to cancel the timer // when the component is removed this.debouncedClick.cancel() }, methods: { click() { // ... respond to click ... } } }[x] Computed Properties
虽然支持在 Template 用插值表达式写一些表达式,但是如果太长其实不便于阅读,这里最好的是使用
Computed计算属性来写,更便于阅读也更便于修改。使用
Method也可以实现和computed一样的效果,但是我们应该要使用Computed,因为其会对数据做一层监听和缓存,只有当参与计算的属性变化时才会重新计算(render),而如果是method,则是会不管不顾,有数据变化就计算一次。所以这个也是性能优化的一个点。这块自己亲自写个小 demo 验证一下就很清晰了
[x] Class and Style Bindings
通过
v-bind方式绑定class和style,大部分的知识点都比较熟悉,也有最新学习到的内容,就是直接给组件标签绑定类名,如果该的子节点只有一个元素(字根),那么子根会默认继承这个 class 的。vue<my-component class="baz boo"> <p class="foo bar">Hi!</p> </my-component><my-component class="baz boo"> <p class="foo bar">Hi!</p> </my-component>那么实际上会被渲染为:
vue<p class="foo bar baz boo">Hi!</p><p class="foo bar baz boo">Hi!</p>如果组件标签下有多个一级子元素,那么可以使用
$attrs.class进行定向的接收:vue<my-component class="baz boo"> <p class="foo bar">Hi!</p> <h2 :class="$attrs.class">OK</h2> </my-component><my-component class="baz boo"> <p class="foo bar">Hi!</p> <h2 :class="$attrs.class">OK</h2> </my-component>那么实际上会被渲染为:
vue<p class="foo bar">Hi!</p> <h2 class="baz boo">OK</h2><p class="foo bar">Hi!</p> <h2 class="baz boo">OK</h2>[x] Conditional Rendering
v-if和v-show指令的介绍以及二者的区别,文档使用 v-if 时使用了一个更好的方式,就是使用<template>来作为根节点,过去我都是使用div标签作为根,这种其实更不好,无形之中多了一层结构,其实更不好。vue<template v-if="ok"> <h1>Title</h1> <p>Paragraph 1</p> <p>Paragraph 2</p> </template><template v-if="ok"> <h1>Title</h1> <p>Paragraph 1</p> <p>Paragraph 2</p> </template>这一块的最后给出了一个提示,也是一道经典的 vue 面试题,
v-if不能和v-show一起使用。文档给出的答案:When
v-ifandv-forare both used on the same element,v-ifwill be evaluated first.那就是
v-if如果和v-show一起使用的话,会执行v-if[x] List Render
v-for 的内容经常在用,所以大部分知识点都知道,其中一个和 v-if 一样的是可以配合
Template一起使用(如果不想造成过多的 div 嵌套的情况下)vue<ul> <template v-for="item in items"> <li>{{ item.msg }}</li> <li class="divider" role="presentation"></li> </template> </ul><ul> <template v-for="item in items"> <li>{{ item.msg }}</li> <li class="divider" role="presentation"></li> </template> </ul>再次解释为什么
v-for和v-if不能一起使用,看下面的例子就明白了:vue<li v-for="todo in todos" v-if="!todo.isComplete"> {{ todo.name }} </li><li v-for="todo in todos" v-if="!todo.isComplete"> {{ todo.name }} </li>如果这样写,会报错 todo is not defined之类的错误,因为
v-if有着更加高的优先级,所以一起出现时会先解析v-if中的条件语句,而这时候,todo 还没有被定义,就会产生报错。[x] Event Handler
这块汲取到的新知识有时间事件修饰符:
修饰符 作用 @click.once 点击事件最多被触发 1 次 键盘事件的修饰符:
修饰符 作用 @keyup.enter 回车键被按下 @keyup.tab tab 被按下 @keyup.delete delete 被按下 @keyup.esc esc 被按下 @keyup.space 空格被按下 @keyup.up 上按下 @keyup.down 下键被按下 @keyup.left 左键被按下 @keyup.right 右键被按下 过去不知道到这些指令,要实现的话还需要手动去判断键盘对应的案件码还是一个相对繁琐的过程,而现在 vue 已经帮我们封装置指令上,使用起来可以非常的优雅。
[x] Form Input Bingings
v-model的使用,可以在表单是实现数据双向绑定几个修饰符:
修饰符 作用 .lazy 默认情况下是同步更改,可添加修饰符使其在事件之后再同步 .number 自动转类型为 number .trim 自动去除空白 [x] Lifecycle Hooks

一图胜前言,需要知道的是
setup是在最早执行的,执行时机甚至早于beforeCreate[x] Wather
在
Composition API中,使用watch(从 vue 包中导入)监听 reactive 对象某个属性变化时很容易写错,我们监听的对象需要使用函数的形式在处理,如:vue// Incorrect use <script> const obj = reactive({ count: 0 }) // this won't work because we are passing a number to watch() watch(obj.count, count => { console.log(`count is: ${count}`) }) </script> // correctly use <script> const obj = reactive({ count: 0 }) // this won't work because we are passing a number to watch() watch( () => obj.count, count => { console.log(`count is: ${count}`) } ) </script>// Incorrect use <script> const obj = reactive({ count: 0 }) // this won't work because we are passing a number to watch() watch(obj.count, count => { console.log(`count is: ${count}`) }) </script> // correctly use <script> const obj = reactive({ count: 0 }) // this won't work because we are passing a number to watch() watch( () => obj.count, count => { console.log(`count is: ${count}`) } ) </script>watch默认是深度的watch,如果不想深度观察可以给其传第三个参数,如:vue<script> ;() => state.someObject, (newValue, oldValue) => { // Note: `newValue` will be equal to `oldValue` here // *unless* state.someObject has been replaced }, { deep: false } </script><script> ;() => state.someObject, (newValue, oldValue) => { // Note: `newValue` will be equal to `oldValue` here // *unless* state.someObject has been replaced }, { deep: false } </script>[x] Template Refs
ref 绑定 DOM 的方法。
[x] Components Basics
大部分的用法已经很熟悉了,其中
Slot是过去我再Vue2时期就不太会用的东西,这里大致的学习一下。vue<template> <AlertBox> Something bad happened. </AlertBox> </template><template> <AlertBox> Something bad happened. </AlertBox> </template>vue<template> <div class="alert-box"> <strong>This is an Error for Demo Purposes</strong> <slot /> </div> </template> <style scoped> .alert-box { /* ... */ } </style><template> <div class="alert-box"> <strong>This is an Error for Demo Purposes</strong> <slot /> </div> </template> <style scoped> .alert-box { /* ... */ } </style>AlertBox组件内部只需要直接使用<slot />标签,就可以将原本<AlertBox>children</AlertBox>内部的children自动的代入进去。动态组件
使用
<component :is="myComponent">即可创建一个动态组件,而且还能配合神奇的<KeepAlive>组件实现强制缓存内容:vue<template> <KeepAlive> <component :is="MyComponent"> </KeepAlive> </template><template> <KeepAlive> <component :is="MyComponent"> </KeepAlive> </template>[x] Component Register
我们可以全局注册组件也可以在需要使用的地方注册组件
本地注册(局部注册)有着更好的
Tree shaking支持,如果是全局注册的组件,即使我们并未使用,也任然会被打包入最后的代码包,所以使用全局组件时需要慎重。组件不支持继承(父组件注册的组件只能在父组件中使用,子组件不能使用)
推荐使用驼峰命名法命名组件
[x] Props
组件props是单向数据流,默认情况下我们无法从子组件改变父组件的值,如果强制改变会给出警告,如果props是对象或者数组类型我们也能改变数组和对象,但是绝对不要这么做,之所以能改变是因为数组和对象本质上是引用类型
props支持类型校验,大致的代码如下:
jsdefineProps({ // Basic type check // (`null` and `undefined` values will allow any type) propA: Number, // Multiple possible types propB: [String, Number], // Required string propC: { type: String, required: true }, // Number with a default value propD: { type: Number, default: 100 }, // Object with a default value propE: { type: Object, // Object or array defaults must be returned from // a factory function. The function receives the raw // props received by the component as the argument. default(rawProps) { return { message: 'hello' } } }, // Custom validator function propF: { validator(value) { // The value must match one of these strings return ['success', 'warning', 'danger'].includes(value) } }, // Function with a default value propG: { type: Function, // Unlike object or array default, this is not a factory function - this is a function to serve as a default value default() { return 'Default function' } } })defineProps({ // Basic type check // (`null` and `undefined` values will allow any type) propA: Number, // Multiple possible types propB: [String, Number], // Required string propC: { type: String, required: true }, // Number with a default value propD: { type: Number, default: 100 }, // Object with a default value propE: { type: Object, // Object or array defaults must be returned from // a factory function. The function receives the raw // props received by the component as the argument. default(rawProps) { return { message: 'hello' } } }, // Custom validator function propF: { validator(value) { // The value must match one of these strings return ['success', 'warning', 'danger'].includes(value) } }, // Function with a default value propG: { type: Function, // Unlike object or array default, this is not a factory function - this is a function to serve as a default value default() { return 'Default function' } } })[x] Component Events
用法基本和vue2用法保持一致,我们可以使用
defineProps定义自定义事件。简单定义:
vue<script setup> const emit = defineEmits(['inFocus', 'submit']) </script><script setup> const emit = defineEmits(['inFocus', 'submit']) </script>ts支持下的类型:
vue<script setup lang="ts"> const emit = defineEmits<{ (e: 'change', id: number): void (e: 'update', value: string): void }>() </script><script setup lang="ts"> const emit = defineEmits<{ (e: 'change', id: number): void (e: 'update', value: string): void }>() </script>事件校验:
vue<script setup> const emit = defineEmits({ // No validation click: null, // Validate submit event submit: ({ email, password }) => { if (email && password) { return true } else { console.warn('Invalid submit event payload!') return false } } }) function submitForm(email, password) { emit('submit', { email, password }) } </script><script setup> const emit = defineEmits({ // No validation click: null, // Validate submit event submit: ({ email, password }) => { if (email && password) { return true } else { console.warn('Invalid submit event payload!') return false } } }) function submitForm(email, password) { emit('submit', { email, password }) } </script>学到了一个非常新的操作,就是使用
v-model快速的双向设置props和event,实现组件级别的数据双向绑定:vue<MyComponent v-model:title="bookTitle" /> <!-- MyComponent.vue --> <script setup> defineProps(['title']) defineEmits(['update:title']) </script> <template> <input type="text" :value="title" @input="$emit('update:title', $event.target.value)" /> </template><MyComponent v-model:title="bookTitle" /> <!-- MyComponent.vue --> <script setup> defineProps(['title']) defineEmits(['update:title']) </script> <template> <input type="text" :value="title" @input="$emit('update:title', $event.target.value)" /> </template>[x] Fallthrough Attributes
当我们直接在组件上添加一些 DOM 属性时,DOM的子元素会自动继承这些属性,如:
vue<MyButton class="large" /><MyButton class="large" />组件实际会被渲染为:
vue<button class="large">click me</button><button class="large">click me</button>如果我们想手动禁止属性的继承,可以配置上
inheritAttrs: false配置来阻止继承:vue<script> // use normal <script> to declare options export default { inheritAttrs: false } </script> <script setup> // ...setup logic </script><script> // use normal <script> to declare options export default { inheritAttrs: false } </script> <script setup> // ...setup logic </script>在
script setup中,可以使用useAttrs,来获取组件的attrs属性集合,想到于$attrsvue<script setup> import { useAttrs } from 'vue' const attrs = useAttrs() </script><script setup> import { useAttrs } from 'vue' const attrs = useAttrs() </script>[x] Slot
在过去其实我一直对于
Slot这个操作用的非常少(因为最早没学好,导致在开发时对于这个技术其实有一些抵触),我们不使用 slot ,就使用props一样也可以开发,但是那样有时候就不够优雅。slot 的概念有点像 react 中 props中的 children,简单的例子如下:
vue<FancyButton> Click me! <!-- slot content --> </FancyButton><FancyButton> Click me! <!-- slot content --> </FancyButton>FancyButton组件内部:
vue<button class="fancy-btn"> <slot></slot> <!-- slot outlet --> </button><button class="fancy-btn"> <slot></slot> <!-- slot outlet --> </button>实际上就会被渲染为:
vue<button class="fancy-btn"> Click me! </button><button class="fancy-btn"> Click me! </button>这种方式明显比 props 要优雅很多。
slot默认值
vue<button type="submit"> <slot> Submit <!-- fallback content --> </slot> </button><button type="submit"> <slot> Submit <!-- fallback content --> </slot> </button>此例子中,如果组件并没有传slot的值,则这时候默认会将 Submit 渲染出来,如果有传值则会将值渲染出来,这是一个兜底的方案。
name slot
假设我们有个
BaseLoyout组件,其内部为:vue<div class="container"> <header> <slot name="header"></slot> </header> <main> <slot></slot> </main> <footer> <slot name="footer"></slot> </footer> </div><div class="container"> <header> <slot name="header"></slot> </header> <main> <slot></slot> </main> <footer> <slot name="footer"></slot> </footer> </div>那么在使用slot传值时就可以根据名字传值:
vue<BaseLayout> <template #header> <h1>Here might be a page title</h1> </template> <template #default> <p>A paragraph for the main content.</p> <p>And another one.</p> </template> <template v-slot:footer> <p>Here's some contact info</p> </template> </BaseLayout><BaseLayout> <template #header> <h1>Here might be a page title</h1> </template> <template #default> <p>A paragraph for the main content.</p> <p>And another one.</p> </template> <template v-slot:footer> <p>Here's some contact info</p> </template> </BaseLayout>使用
#header是一种简写方式,和v-slot:header是一样的,这个写法在vantUI中蛮多地方都这样写过。[x] Provider / Inject
Provider / Inject也是一种组件传值的方式,使用Provider共享一个值,则其的子孙组件都可以使用Inject来捕获到这个值,初看和vuex的概念好像有点像,其主要是为了解决像 props 一层一层传值时太过了复杂和繁琐了所以设计的这个API,只要是子孙组件就可以使用捕获到这个值。如果我们在最外层
Provider值,其实就是一个全局状态了!其
providerreactive和ref时处理也会略微有一些不用,具体的可以再看文档复习一下。[x] Async Component
通过
defineAsyncComponentAPI 我们可以创建一个异步函数,基础用法如下:jsimport { defineAsyncComponent } from 'vue' const AsyncComp = defineAsyncComponent(() => { return new Promise((resolve, reject) => { // ...load component from server resolve(/* loaded component */) }) })import { defineAsyncComponent } from 'vue' const AsyncComp = defineAsyncComponent(() => { return new Promise((resolve, reject) => { // ...load component from server resolve(/* loaded component */) }) })该函数返回的是一个Promise,所以我们其实是可以根据喝过API来实现一些懒加载的,尤其是当一些非常大型的项目的时候。
高阶用法 - 错误状态处理
jsconst AsyncComp = defineAsyncComponent({ // the loader function loader: () => import('./Foo.vue'), // A component to use while the async component is loading loadingComponent: LoadingComponent, // Delay before showing the loading component. Default: 200ms. delay: 200, // A component to use if the load fails errorComponent: ErrorComponent, // The error component will be displayed if a timeout is // provided and exceeded. Default: Infinity. timeout: 3000 })const AsyncComp = defineAsyncComponent({ // the loader function loader: () => import('./Foo.vue'), // A component to use while the async component is loading loadingComponent: LoadingComponent, // Delay before showing the loading component. Default: 200ms. delay: 200, // A component to use if the load fails errorComponent: ErrorComponent, // The error component will be displayed if a timeout is // provided and exceeded. Default: Infinity. timeout: 3000 })光看例子应该就蛮清晰的了,我们可以比较轻松的实现一个带有加载效果的异步的组件。
所以下回面试官如果问如果实现懒加载等等之类的,异步组件也是一个回答。
[x] Composables
逻辑组合,在过去我们经常在一些常用的例子中写上一些重复的逻辑,在Vue3这个大版本下我们可以将这些逻辑做上组合,也就是 组合API ,上一个简单的例子:
vue<script setup> import { ref, onMounted, onUnmounted } from 'vue' const x = ref(0) const y = ref(0) function update(event) { x.value = event.pageX y.value = event.pageY } onMounted(() => window.addEventListener('mousemove', update)) onUnmounted(() => window.removeEventListener('mousemove', update)) </script> <template>Mouse position is at: {{ x }}, {{ y }}</template><script setup> import { ref, onMounted, onUnmounted } from 'vue' const x = ref(0) const y = ref(0) function update(event) { x.value = event.pageX y.value = event.pageY } onMounted(() => window.addEventListener('mousemove', update)) onUnmounted(() => window.removeEventListener('mousemove', update)) </script> <template>Mouse position is at: {{ x }}, {{ y }}</template>以上这个例子,如果我们要在其他组件中使用,在过去好像只能把这些代码大致的抄一下,但是在这个大版本下,我们就可以将其逻辑进行 组合抽离,组合成一个
useMouse组合API:js// mouse.js import { ref, onMounted, onUnmounted } from 'vue' // by convention, composable function names start with "use" export function useMouse() { // state encapsulated and managed by the composable const x = ref(0) const y = ref(0) // a composable can update its managed state over time. function update(event) { x.value = event.pageX y.value = event.pageY } // a composable can also hook into its owner component's // lifecycle to setup and teardown side effects. onMounted(() => window.addEventListener('mousemove', update)) onUnmounted(() => window.removeEventListener('mousemove', update)) // expose managed state as return value return { x, y } }// mouse.js import { ref, onMounted, onUnmounted } from 'vue' // by convention, composable function names start with "use" export function useMouse() { // state encapsulated and managed by the composable const x = ref(0) const y = ref(0) // a composable can update its managed state over time. function update(event) { x.value = event.pageX y.value = event.pageY } // a composable can also hook into its owner component's // lifecycle to setup and teardown side effects. onMounted(() => window.addEventListener('mousemove', update)) onUnmounted(() => window.removeEventListener('mousemove', update)) // expose managed state as return value return { x, y } }在需要使用的地方只要使用:
vue<script setup> import { useMouse } from './mouse.js' const { x, y } = useMouse() </script> <template>Mouse position is at: {{ x }}, {{ y }}</template><script setup> import { useMouse } from './mouse.js' const { x, y } = useMouse() </script> <template>Mouse position is at: {{ x }}, {{ y }}</template>简单了很多,但是也是有一些细节和一些组合的约定:
- 所有的自定义封装的组合函数都以
use开头,如useMouse、useFetch - 组合API 返回的一个个值要用
ref而不是reactive - 如果是一些SSR应用要注意,一些操作要在
onMounted里执行,避免一些不必要的错误。
如果我们在
optionAPI中使用的,需要在setup()函数中使用:jsimport { useMouse } from './mouse.js' import { useFetch } from './fetch.js' export default { setup() { const { x, y } = useMouse() const { data, error } = useFetch('...') return { x, y, data, error } }, mounted() { // setup() exposed properties can be accessed on `this` console.log(this.x) } // ...other options }import { useMouse } from './mouse.js' import { useFetch } from './fetch.js' export default { setup() { const { x, y } = useMouse() const { data, error } = useFetch('...') return { x, y, data, error } }, mounted() { // setup() exposed properties can be accessed on `this` console.log(this.x) } // ...other options }组合的一些优势
对比
mixin,组合基本可以实现mixin的所有能实现的内容,可以更加的方便,还可以避免一些不好的事情:来历不明的属性
如果mixin使用多了,我们可能还需要判断一下一些属性是从哪里mixin来的,比较复杂
命名空间的重复
如果mixin的属性名和原本自身的属性名重复,也是会出现问题的。
对比于
react-hooks可能用起来是非常非常的像,但是这个组合是基于 vue自身的所有的响应式系统。本质上还是两个东西。
- 所有的自定义封装的组合函数都以
[x] Custom Directive
自定义指令的介绍,我们可以自己定义一些指令,定义好了之后就可以和
v-if、v-show一样使用,和组件一样,指令也有组件内指令和全局指令两种。过去使用自定义指令比较少,现在这个版本自定义指令内部就支持生命周期!非常的给力!
jsconst myDirective = { // called before bound element's attributes // or event listeners are applied created(el, binding, vnode, prevVnode) { // see below for details on arguments }, // called right before the element is inserted into the DOM. beforeMount() {}, // called when the bound element's parent component // and all its children are mounted. mounted() {}, // called before the parent component is updated beforeUpdate() {}, // called after the parent component and // all of its children have updated updated() {}, // called before the parent component is unmounted beforeUnmount() {}, // called when the parent component is unmounted unmounted() {} }const myDirective = { // called before bound element's attributes // or event listeners are applied created(el, binding, vnode, prevVnode) { // see below for details on arguments }, // called right before the element is inserted into the DOM. beforeMount() {}, // called when the bound element's parent component // and all its children are mounted. mounted() {}, // called before the parent component is updated beforeUpdate() {}, // called after the parent component and // all of its children have updated updated() {}, // called before the parent component is unmounted beforeUnmount() {}, // called when the parent component is unmounted unmounted() {} }虽然自定义指令很强大,但是也有一些细节需要注意:
- 只有当所需的功能只能通过直接 DOM 操作来实现时,才应使用自定义指令。
- 如果已经内置的指令,有限使用内置指令,内置指令具有更好的兼容性!
- 指令也支持生命周期,且支持丰富的参数获取,这点可以看下文档。
- 现在的版本一个组件可能有多个根结点,所以不建议直接在组件标签上使用指令。
[x] Plugin
Vue使用插件是使用实例上的
use方法,我们如果需要自定义一个插件,那么这个插件一定需要有一个install方法,这个方法可以获取到app实例,和一些配置项。正是因为我们可以获取到app实例,所以我们可以根据实例来创建一些组件和指令,这个就是那些UI组件库实现的原理!
jsimport { createApp } from 'vue' const app = createApp({}) app.use(myPlugin, { /* optional options */ }) // const myPlugin = { install(app, options) { // configure the app } }import { createApp } from 'vue' const app = createApp({}) app.use(myPlugin, { /* optional options */ }) // const myPlugin = { install(app, options) { // configure the app } }我们可以做这些东西:
- 组件库 =>
app.component() - 工具库 =>
app.directive() - 仓库类的工具 =>
app.provider() - 绑定一些全局方法,如网络请求 =>
app.config.globalProperties.$api = xxx
终于知道那些第三方框架的实现原因了,vue自身提供了接口。
- 组件库 =>
[x] Transition
Transition是Vue提供的一个内置组件,帮助我们更加优雅是实现一些动画的,其可以运用在DOM上,也可以运用在组件上,常常运用于像
v-if、v-show、<Component />上,其含有最重要的6个类:
其含有一个
name属性,如果没有设置name属性之前,绑定动画的 类名 都以v开头,如果我们设置了name之后则以对应的一个name开发,如.fade-enter-form,动画是灵活的,我们完全可以和原生的CSS一些动画和过度属性混合起来使用,甚至可以直接配合css动画库,像
animate css。这版本动画还非常贴心的给我们提供了动画的生命周期,使得我们有能力可以在特殊的时期去做一些时期。
vue<Transition @before-enter="onBeforeEnter" @enter="onEnter" @after-enter="onAfterEnter" @enter-cancelled="onEnterCancelled" @before-leave="onBeforeLeave" @leave="onLeave" @after-leave="onAfterLeave" @leave-cancelled="onLeaveCancelled" > <!-- ... --> </Transition><Transition @before-enter="onBeforeEnter" @enter="onEnter" @after-enter="onAfterEnter" @enter-cancelled="onEnterCancelled" @before-leave="onBeforeLeave" @leave="onLeave" @after-leave="onAfterLeave" @leave-cancelled="onLeaveCancelled" > <!-- ... --> </Transition>js// called before the element is inserted into the DOM. // use this to set the "enter-from" state of the element function onBeforeEnter(el) {}, // called one frame after the element is inserted. // use this to start the entering animation. function onEnter(el, done) { // call the done callback to indicate transition end // optional if used in combination with CSS done() } // called when the enter transition has finished. function onAfterEnter(el) {} function onEnterCancelled(el) {} // called before the leave hook. // Most of the time, you should just use the leave hook function onBeforeLeave(el) {} // called when the leave transition starts. // use this to start the leaving animation. function onLeave(el, done) { // call the done callback to indicate transition end // optional if used in combination with CSS done() } // called when the leave transition has finished and the // element has been removed from the DOM. function onAfterLeave(el) {} // only available with v-show transitions function leaveCancelled(el) {}// called before the element is inserted into the DOM. // use this to set the "enter-from" state of the element function onBeforeEnter(el) {}, // called one frame after the element is inserted. // use this to start the entering animation. function onEnter(el, done) { // call the done callback to indicate transition end // optional if used in combination with CSS done() } // called when the enter transition has finished. function onAfterEnter(el) {} function onEnterCancelled(el) {} // called before the leave hook. // Most of the time, you should just use the leave hook function onBeforeLeave(el) {} // called when the leave transition starts. // use this to start the leaving animation. function onLeave(el, done) { // call the done callback to indicate transition end // optional if used in combination with CSS done() } // called when the leave transition has finished and the // element has been removed from the DOM. function onAfterLeave(el) {} // only available with v-show transitions function leaveCancelled(el) {}如果我们还想在节点的初始渲染上应用过渡,可以添加出现属性:apper
vue<Transition appear> ... </Transition><Transition appear> ... </Transition>我能想到的最佳实践当然就是和
<components />组件配合使用了,大致如下:vue<Transition :name="transitionName"> <!-- ... --> </Transition><Transition :name="transitionName"> <!-- ... --> </Transition>[x] KeepAlive
<KeepAlive>也是vue提供的一个内置组件,其可以帮助我们缓存住一个组件,缓存的概念是特别重要的,是一个提升用户体验的一个非常棒的方式。当我们使用了
KeepAlive之后,因为组件理论上不会被卸载,是被一直缓存住,所以组件的onMounted只会执行一次,所以相对应的,缓存组件也有两个独特的生命周期钩子onActivated和onDeactivated,分别对应组件是否处于激活的状态,同时其有
include和excluse属性,可以用来做一些条件缓存:如下:只缓存 a组件和b组件
vue<!-- comma-delimited string --> <KeepAlive include="a,b"> <component :is="view" /> </KeepAlive> <!-- regex (use `v-bind`) --> <KeepAlive :include="/a|b/"> <component :is="view" /> </KeepAlive> <!-- Array (use `v-bind`) --> <KeepAlive :include="['a', 'b']"> <component :is="view" /> </KeepAlive><!-- comma-delimited string --> <KeepAlive include="a,b"> <component :is="view" /> </KeepAlive> <!-- regex (use `v-bind`) --> <KeepAlive :include="/a|b/"> <component :is="view" /> </KeepAlive> <!-- Array (use `v-bind`) --> <KeepAlive :include="['a', 'b']"> <component :is="view" /> </KeepAlive>还有
max属性,用来表示最多可以缓存多少个组件:vue<KeepAlive :max="10"> <component :is="activeComponent" /> </KeepAlive><KeepAlive :max="10"> <component :is="activeComponent" /> </KeepAlive>[x] Teleport
Teleport翻译的意思就是传送,也就是如果我们使用
Teleport包裹的组件可以被传送至某个位置!在过去我们经常遇到一些场景,我们编写的某个组件在逻辑上是在所处的位置,但是在最终渲染的效果上并不是真实的位置,最好理解的就是各种弹窗:我们写的时候可能是在某个子组件上写,但是真真渲染出来的时候,弹窗是在最外层,且相对屏幕居中,就好像在body那一层。
在没有Teleport的时候,我们要实现这样就只能配合一些css的定位属性去使用,多少会有一点儿繁琐和可能会有一些意想不到的问题,但是现在使用Teleport之后就不会了,可以直接使用它的
to属性去挂载在最外层!vue<button @click="open = true">Open Modal</button> <Teleport to="body"> <div v-if="open" class="modal"> <p>Hello from the modal!</p> <button @click="open = false">Close</button> </div> </Teleport><button @click="open = true">Open Modal</button> <Teleport to="body"> <div v-if="open" class="modal"> <p>Hello from the modal!</p> <button @click="open = false">Close</button> </div> </Teleport>如果想让整个动画都优雅起来我们甚至还能配合之前学习的
Transition组件。还有一个要注意的点:本质上它是所有东西都渲染好之后才被传送至了指定的位置(这个可以像JS的词法作用域那样去理解),也就是我们任然是可以拿到父子组件传值的。
[x] Single-File Components
使用
.vue单文件组件是有很多好处的:- 使用熟悉的模块化的html css js语法编写组件
- 支持预编译模板
- 独立的CSS作用于
- 更加高效和好用的语法糖
- 并且很多编辑器都支持非常的好的插件
单文件组件之所以能够生效主要其实
Vue的一个@vue/compiler-sfc模块的作用,它能够编译我们的单文件组件很多有经验的程序员会觉得,html、css、js应该分离,分开写更容易维护,但是单纯的分开其实并不意味着更好维护,相反,如果他们组合起来是为了实现同一个目标,那样将他们写在一起反而是更好维护的。如果不认同这个理念,vue也还是有提供 import 的支持,支持将JS 和 css从其他文件中引入进来。
[x] Tooling
简单的介绍了一些现在推荐使用的开发工具:
构建工具:推荐使用Vite
vscode插件:推荐Volar
[x] Routing
在大多数单页应用中,推荐使用官方的呃
vue-router工具。如果我们只是使用一个非常简单的路由,且不想上全套的vue-router工具,可以简单的通过动态组件和history API来实现:vue<script setup> import { ref, computed } from 'vue' import Home from './Home.vue' import About from './About.vue' import NotFound from './NotFound.vue' const routes = { '/': Home, '/about': About } const currentPath = ref(window.location.hash) window.addEventListener('hashchange', () => { currentPath.value = window.location.hash }) const currentView = computed(() => { return routes[currentPath.value.slice(1) || '/'] || NotFound }) </script> <template> <a href="#/">Home</a> | <a href="#/about">About</a> | <a href="#/non-existent-path">Broken Link</a> <component :is="currentView" /> </template><script setup> import { ref, computed } from 'vue' import Home from './Home.vue' import About from './About.vue' import NotFound from './NotFound.vue' const routes = { '/': Home, '/about': About } const currentPath = ref(window.location.hash) window.addEventListener('hashchange', () => { currentPath.value = window.location.hash }) const currentView = computed(() => { return routes[currentPath.value.slice(1) || '/'] || NotFound }) </script> <template> <a href="#/">Home</a> | <a href="#/about">About</a> | <a href="#/non-existent-path">Broken Link</a> <component :is="currentView" /> </template>[x] State Management
由于
CompositionAPI的缘故,我们可以快速的实现一些简单的全局状态管理:js// store.js import { reactive } from 'vue' export const store = reactive({ count: 0 })// store.js import { reactive } from 'vue' export const store = reactive({ count: 0 })vue<!-- ComponentA.vue --> <script setup> import { store } from './store.js' </script> <template>From A: {{ store.count }}</template><!-- ComponentA.vue --> <script setup> import { store } from './store.js' </script> <template>From A: {{ store.count }}</template>但是如果是大项目大工程,还是应该上官方的全局状态管理工具
Pinia使用它能够让我们更加规范进行团队开发,而原来的vuex作为上一代的官方工具会继续维护,知识不再会支持新的特性了。所以Pinia内部也称为vuex5[x] Production Deployment
如果我们没有使用构建工具的情况下,使用cdn或者本地script脚本,记得选择生产版本
.prod.js使用构建工具的话则不需要考虑这些
另外我们可以监控运行时的错误:
jsimport { createApp } from 'vue' const app = createApp(...) app.config.errorHandler = (err, instance, info) => { // report error to tracking services }import { createApp } from 'vue' const app = createApp(...) app.config.errorHandler = (err, instance, info) => { // report error to tracking services }[x] Performance
性能是框架是否好用的一大指标,web应用最重要的两大性能分别是: 应用加载性能、应用更新性能
有个API可以用于检测浏览器的 performance:
jsapp.config.performance = ()=>{}app.config.performance = ()=>{}应用加载性能优化
如果可以的话,一定要尽可能使用使用 构建步骤 因为构建过程会包含
tree-shaking能减少代码的体积选择工具拓展包时也需要注意,优先使用
es类型的包,如lodash-es的优先级应该高于lodash。如果使用
vue是考虑到渐进式的处理,目前只是用其特性的情况下,完全可以使用petitle-vue它的大小甚至只有6kb!做好代码拆分和懒加载,如:
js// lazy.js and its dependencies will be split into a separate chunk // and only loaded when `loadLazy()` is called. function loadLazy() { return import('./lazy.js') }// lazy.js and its dependencies will be split into a separate chunk // and only loaded when `loadLazy()` is called. function loadLazy() { return import('./lazy.js') }以上代码只有在
loadLazy执行的时候才会去加载lazy.js另外也是重中之重,如果我们使用了
vue-router管理前端的路由,那么推荐最好是要上async component异步组件,可以实现组件的懒加载,进一步的提升了加载时的优化最后是可以使用
SSR或SSG,单页应用之所以会出现首屏加载慢的主要原因之一就是因为内容都是通过JS再次渲染出来的,所以首屏性能肯定是不如SSR的应用更新时的优化
避免一些不必要的更新渲染,这点和react非常像
属性需要尽可能的稳定:
vue<ListItem v-for="item in list" :id="item.id" :active-id="activeId" /><ListItem v-for="item in list" :id="item.id" :active-id="activeId" />以上的例子,如果我们的本意是只有当list变化时才更新,那么这么做可能就会造成一些性能的损失,因为
activeId如果变了,也会造成整个列表的重新渲染,所以这也是一个细节。v-once只会触发渲染一次的API
v-memo有条件的跳过一些渲染(和react的useMemo是很像的)
一般情况下的优化
使用虚拟列表:
当我们需要渲染一个很大的列表时,我们并不需要一次渲染全部,只需要渲染出用户的屏幕再大一点即可。有两个工具库:
使用
shallowRef()或者shallowReactive()API进行替换ref和reactive创建的响应式对象都是深层次的响应式对象,当数据结构比较深时,都做监听也是也是一种浪费性能的情况,所以可以使用shallowRef()和shallowReactive()来做替换,它们都只会监听根级别的数据变化。总结
这个小节涉及的性能优化点真的很多,也概括的很全。面试前必看的一个章节!
[x] Security
安全也是web站点必须要特别重视的问题,一旦有问题vue团队会把这个bug当成最高优先级的任务去处理,所以作者建议我们永远都使用最新版本的vue
vue帮助我们做了一些常见的网络安全的防护。如插值表达式,属性绑定禁止插入script标签。大致如下:
vue<h1>{{ userProvidedString }}</h1><h1>{{ userProvidedString }}</h1>可能 userProvidedString 是:
'<script>alert("hi")</script>'所以正常如果无防护的情况下,是一定会有弹窗的,vue帮助我们转义了,最终渲染出来的是这样:<script>alert("hi")</script>还有的像动态属性上的攻击、
v-html可能会有的攻击,url可能会有的攻击:href="javascript..."这类的攻击、style样式攻击、vue都会为我们做好一层防御。[x] TypeScript
使用TS可以在构建阶段就帮我们排查一些错误,极大的减少了项目在生产环境中的一些运行时错误,
最佳推荐使用 vscode+volar 开发ts的应用
为了让 TypeScript 正确推断组件选项中的类型,我们需要使用 defineComponent() 定义组件
tsimport { defineComponent } from 'vue' export default defineComponent({ // type inference enabled props: { name: String, msg: { type: String, required: true } }, data() { return { count: 1 } }, mounted() { this.name // type: string | undefined this.msg // type: string this.count // type: number } })import { defineComponent } from 'vue' export default defineComponent({ // type inference enabled props: { name: String, msg: { type: String, required: true } }, data() { return { count: 1 } }, mounted() { this.name // type: string | undefined this.msg // type: string this.count // type: number } })TS 很多知识点只有真正在开发中才会掌握的更多。
[x] TS with Componsition API
TS 在 Componsition API 中的一些使用,让我们有了类型系统,大部分和react的useState一样,通过传递泛型来约束:
tsimport { reactive } from 'vue' interface Book { title: string year?: number } const book: Book = reactive({ title: 'Vue 3 Guide' }import { reactive } from 'vue' interface Book { title: string year?: number } const book: Book = reactive({ title: 'Vue 3 Guide' }...... 其他更多的要在真正开发过程中才会有更好的认识
[x] TS with Options API
因为已经不推荐使用 Options API 进行开发了,所以这部分跳过
[x] Way os Using Vue
Vue的涉及初衷就是灵活和渐进,所以并没有限制它只能做什么。
Vue可以单独引入script标签进行工作,如果是这种场景,更加建议使用另外一个发行版本的
petite-vue,它的大小甚至只有20多kb!可以用Vue开发单页应用(主场景),提供了很多官方的插件与工具支持
还可以开发ssr应用
并没有限制其只能在web,在移动应用,canvas,甚至是终端都可以接入Vue的自定义渲染器。
[x] Composition API FAQ
Composition API 是一系列API的集合,主要包括声明变量的
ref、reactive,生命周期钩子,以及依赖注入的API,provider()、inject(),尽管此API好像都是函数,但是本质上并不属于函数式编程。为什么使用组合API?
组合API有更好的逻辑复用能力,并且社区基于组合API已经有了很多很好用的工具库,如
VueUse,同时组合API还有着更灵活的代码组织能力,很多开发者更喜欢OptionAPI,因为其暴露了一些规定好的接口,不容易报错,但是这中规范也可以理解为是一种局限或者限制。最后是有着更好的类型推断,现在项目都使用ts,由于optionAPI的想法源于2013年,那时候还没有将ts考虑在内,以至于在过于如果要使用ts要使用classapi。就没有了那么好的开发体验了,而组合api则会有更好的ts开发体验。Composition API 与 ReactHooks
必须承认两者非常的像,react hooks每次组件重新渲染时都会执行一次,并且会有一些列的闭包问题,比较考验开发者的开发经验,以及像
useMemo,useCallback,会涉及一系列依赖问题,改变时会再次触发。而组合api的hooks只会执行一次,其内部的一些值的响应式是依赖于Vue自身的响应式系统,且不需要手动缓存回调函数等等。
React Hooks 的创造力,它是 Composition API 的主要灵感来源,但是在个别场景下,组合api的表现不差于reacthooks
[x] Reactivity in Depth
深入了解vue的响应式系统,再vue3中,响应式系统是通过
Proxy API实现的,文档中大致的给出了一个实现响应式系统的实现原型,其中我们必须知道的是,vue的响应式系统是基于运行时的,因为所有触发更新的依赖等等都是在运行时动态的绑定彼此的依赖关系虽然响应式已经非常的好用,但是在一些特殊的边缘例子中我们任然会需要debug,好在的是vue也提供了这些debug的组件hooks,
组件debug hooks
vue<script setup> import { onRenderTracked, onRenderTriggered } from 'vue' onRenderTracked((event) => { debugger }) onRenderTriggered((event) => { debugger }) </script><script setup> import { onRenderTracked, onRenderTriggered } from 'vue' onRenderTracked((event) => { debugger }) onRenderTriggered((event) => { debugger }) </script>computed debug hooks
jsconst plusOne = computed(() => count.value + 1, { onTrack(e) { // triggered when count.value is tracked as a dependency debugger }, onTrigger(e) { // triggered when count.value is mutated debugger } }) // access plusOne, should trigger onTrack console.log(plusOne.value) // mutate count.value, should trigger onTrigger count.value++const plusOne = computed(() => count.value + 1, { onTrack(e) { // triggered when count.value is tracked as a dependency debugger }, onTrigger(e) { // triggered when count.value is mutated debugger } }) // access plusOne, should trigger onTrack console.log(plusOne.value) // mutate count.value, should trigger onTrigger count.value++wather debug hooks
jswatch(source, callback, { onTrack(e) { debugger }, onTrigger(e) { debugger } }) watchEffect(callback, { onTrack(e) { debugger }, onTrigger(e) { debugger } })watch(source, callback, { onTrack(e) { debugger }, onTrigger(e) { debugger } }) watchEffect(callback, { onTrack(e) { debugger }, onTrigger(e) { debugger } })vue的响应式系统是可以独立运行的,其基于原生的js,所以完全可以将它脱离出来单独使用。
[x] Rendering Mechanism
主要介绍vue是如何通过template模板到真实dom的,更新时那么依赖执行机制,
虚拟DOM
灵感来源于React,和很多其他虚拟DOM一样,vue也有自己对弈虚拟DOM的一种实现方式和理解,一个最简单的虚拟DOM结构:
jsconst vnode = { type: 'div', props: { id: 'hello' }, children: [ /* more vnodes */ ] }const vnode = { type: 'div', props: { id: 'hello' }, children: [ /* more vnodes */ ] }运行时的渲染函数将虚拟DOM转换成真实DOM树过程叫做mount挂载
当有更新时会将新的vnode和旧的进行对比,再做指定的更新,这个叫做patch
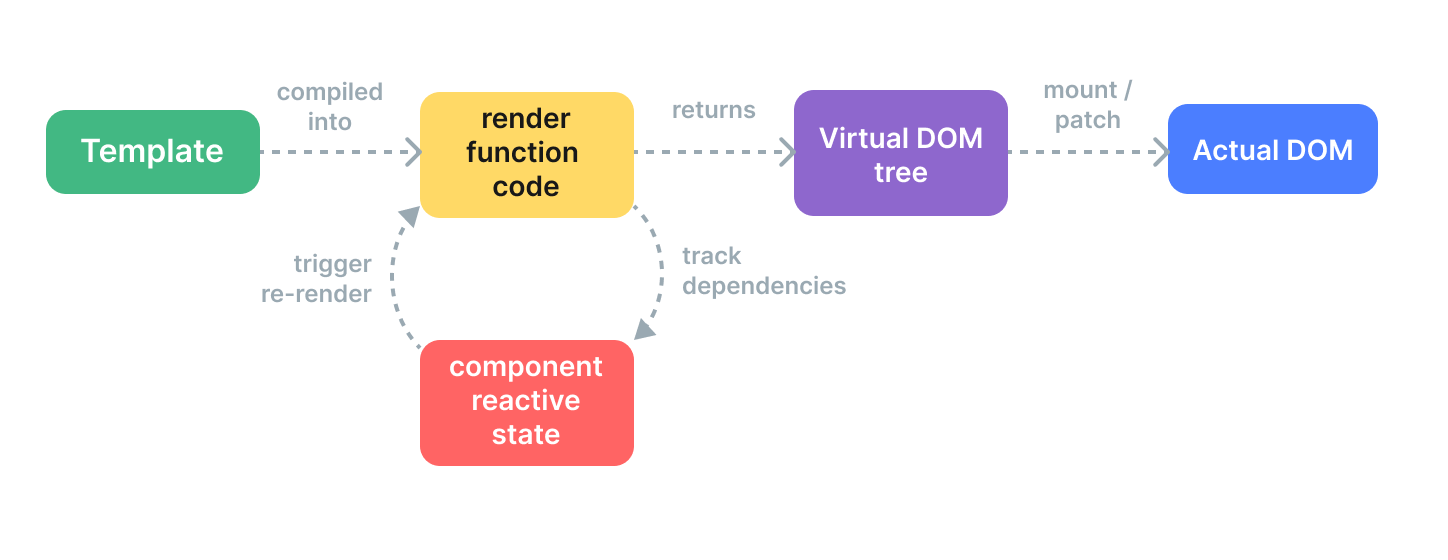
渲染过程
compile
根据template模板将其编译成一个渲染函数:这个渲染函数返回的是一个虚拟DOM的树
mount
运行时的渲染函数,将虚拟DOM转换为真实DOM,并且处理好一些响应式系统的事情
patch
当状态发生改变时做好做好定向的追踪更新
Template VS Render Functions
vue提供了template模板和vnode渲染函数两种API来操作界面,渲染函数拥有更多的灵活性,可以更方便的处理一些特别复杂逻辑的情况,但是我们仍然是更加推荐使用template的方式
- template更加的接近原生的html,更方便理解
- template有更好的静态分析支持(更有利于做性能优化--框架层面)
真正开发中,template能够满足绝大多数的场景,只有一些比较边缘,如JSX的时候会涉及。
Compiler-Informed Virtual DOM
由于使用了虚拟DOM,则一定会伴随着的问题就是渲染机智,这也是vonde解决方案一直被诟病的地方,如一个根本没有变化的结点,但是它也参与了更新。
vue在这块也做了一些努力和优化处理
静态节点
html<div> <div>foo</div> <!-- hoisted --> <div>bar</div> <!-- hoisted --> <div>{{ dynamic }}</div> </div><div> <div>foo</div> <!-- hoisted --> <div>bar</div> <!-- hoisted --> <div>{{ dynamic }}</div> </div>foo和bar是静态节点,vue会将这些静态节点标记处理,在更新时会跳过diff的过程
patch Flag
html<!-- class binding only --> <div :class="{ active }"></div> <!-- id and value bindings only --> <input :id="id" :value="value"> <!-- text children only --> <div>{{ dynamic }}</div><!-- class binding only --> <div :class="{ active }"></div> <!-- id and value bindings only --> <input :id="id" :value="value"> <!-- text children only --> <div>{{ dynamic }}</div>vue将每次patch的过程中patch类型也做了划分,以致于做到定向更新,不做任何多余的操作
[x] Animation Techniques
尽管Vue提供了
<Transition>和<TransitionGroup>组件方便我们实现一些动画效果,然而,还是有很多方式可以实现动画的,如使用CSS等等,这个章节就是来谈论实现动画还有什么方案基于class实现的动画
vue<div :class="{ shake: disabled }"> <button @click="warnDisabled">Click me</button> <span v-if="disabled">This feature is disabled!</span> </div><div :class="{ shake: disabled }"> <button @click="warnDisabled">Click me</button> <span v-if="disabled">This feature is disabled!</span> </div>css.shake { animation: shake 0.82s cubic-bezier(0.36, 0.07, 0.19, 0.97) both; transform: translate3d(0, 0, 0); } @keyframes shake { 10%, 90% { transform: translate3d(-1px, 0, 0); } 20%, 80% { transform: translate3d(2px, 0, 0); } 30%, 50%, 70% { transform: translate3d(-4px, 0, 0); } 40%, 60% { transform: translate3d(4px, 0, 0); } }.shake { animation: shake 0.82s cubic-bezier(0.36, 0.07, 0.19, 0.97) both; transform: translate3d(0, 0, 0); } @keyframes shake { 10%, 90% { transform: translate3d(-1px, 0, 0); } 20%, 80% { transform: translate3d(2px, 0, 0); } 30%, 50%, 70% { transform: translate3d(-4px, 0, 0); } 40%, 60% { transform: translate3d(4px, 0, 0); } }基于状态的改线来实现动画
vue<div @mousemove="onMousemove" :style="{ backgroundColor: `hsl(${x}, 80%, 50%)` }" class="movearea" > <p>Move your mouse across this div...</p> <p>x: {{ x }}</p> </div><div @mousemove="onMousemove" :style="{ backgroundColor: `hsl(${x}, 80%, 50%)` }" class="movearea" > <p>Move your mouse across this div...</p> <p>x: {{ x }}</p> </div>jsconst x = ref(0) function onMousemove(e) { x.value = e.clientX }const x = ref(0) function onMousemove(e) { x.value = e.clientX }使用wather实现动画
jsimport { ref, reactive, watch } from 'vue' import gsap from 'gsap' const number = ref(0) const tweened = reactive({ number: 0 }) watch(number, (n) => { gsap.to(tweened, { duration: 0.5, number: Number(n) || 0 }) })import { ref, reactive, watch } from 'vue' import gsap from 'gsap' const number = ref(0) const tweened = reactive({ number: 0 }) watch(number, (n) => { gsap.to(tweened, { duration: 0.5, number: Number(n) || 0 }) })vueType a number: <input v-model.number="number" /> <p>{{ tweened.number.toFixed(0) }}</p>Type a number: <input v-model.number="number" /> <p>{{ tweened.number.toFixed(0) }}</p>
以上都是实现动画的方案,并不是一定要使用
<Transition>和<TransitionGroup>,很多时候我们应该选择当下场景最合适,实现代价也比较小的方案来实现动画。[x] Reactivity Transform
自从compisition API 发布以来,在响应式系统这块讨论的最大的一个问题就是使用ref和reactive的问题,使用ref我们在script内部访问值时就得加上
.value,这个是经常被忘记的,而且让一些开发者所感觉很繁琐的操作。所以vue提供了一个还处于实验性质的api,
$,如ref => $ref,这样操作之后我们就可以正常访问ref对象,不需要加上.valuevue<script setup> let count = $ref(0) console.log(count) function increment() { count++ } </script> <template> <button @click="increment">{{ count }}</button> </template><script setup> let count = $ref(0) console.log(count) function increment() { count++ } </script> <template> <button @click="increment">{{ count }}</button> </template>除了$ref之外,其他的api也支持了$符号一起使用
ref -> $ref
computed -> $computed
shallowRef -> $shallowRef
customRef -> $customRef
toRef -> $toRef
ref -> $ref computed -> $computed shallowRef -> $shallowRef customRef -> $customRef toRef -> $toRef$符号属于一个宏定义,因为是一个实验性的功能,所以需要再
vue/macros这个包中导入:jsimport { $ref } from 'vue/macros' let count = $ref(0)import { $ref } from 'vue/macros' let count = $ref(0)通过$结构响应式数据
一个简单的例子就能明白了:
jsimport { useMouse } from '@vueuse/core' const { x, y } = $(useMouse()) console.log(x, y)import { useMouse } from '@vueuse/core' const { x, y } = $(useMouse()) console.log(x, y)以上的例子我们使用了$方法将 useMouse 的返回值做了个简单处理,所以 x,y都是经过宏定义处理过的响应式对象,就可以直接使用了,不需要
x.value和y.value本质上编译的结构的代码时使用了
toRef一样:jsimport { toRef } from 'vue' import { useMouse } from '@vueuse/core' const __temp = useMouse(), x = toRef(__temp, 'x'), y = toRef(__temp, 'y') console.log(x.value, y.value)import { toRef } from 'vue' import { useMouse } from '@vueuse/core' const __temp = useMouse(), x = toRef(__temp, 'x'), y = toRef(__temp, 'y') console.log(x.value, y.value)虽然这个还是实验性的api,但是相信等最终合并到最终的版本之后一定也是一个大热的api!
全英文仓库
这是一个全新的尝试
被一个会写测试的同事给经验到了,借此机会学习jest,并将所学的所有过程都使用英文的形式记录下来,包括所有的 文档和代码注释,希望有助于学习英语。